trainer talk: at-home stretch props
By kara griffin | June 3, 2015, 8:44 am
method-tribe
Cool down at the end of a bari class feels like a big sigh of relief. You worked for it. You made it. You deserve it. And it feels really, really good. While it’s our job to stretch you out after every sweat session, taking the initiative to give your body a little extra TLC on your own time will help your muscles recover more quickly, thereby enhancing your practice. Not sure how to stretch it out on your own? Getting creative with makeshift stretching props will allow you to access deeper stretches, leaving your muscles limber, happy and ready to work for you. Re-purpose these common home items into stretch props for a simple and effective at-home stretching routine.
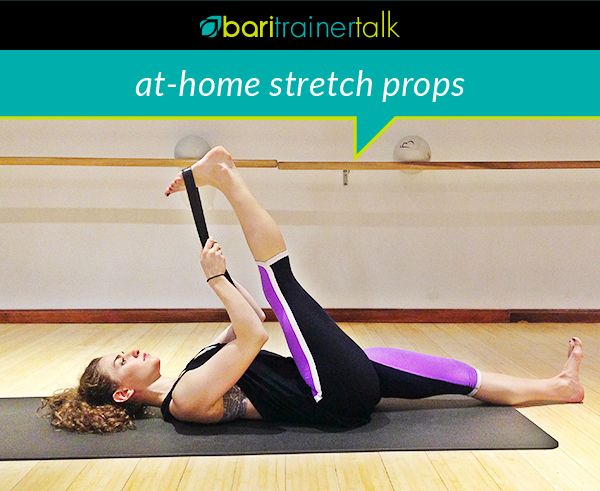
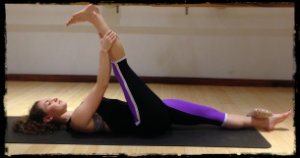
the prop: belt
Belts can work as an extension of your arms to help stretch muscles you can’t normally reach with your hands (think hamstrings!) You can also use them to measure progress by seeing how much slack you have below where your hands are holding. As your slack increases week to week, you’ll know that you muscles are holding less tension!
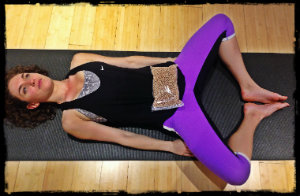
the stretch: hamstring stretch
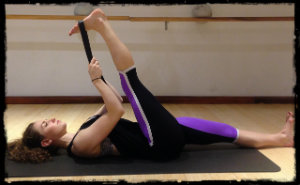
1. Lie down on your back, and place the belt on the ball of your foot.
2. Gently pull the leg towards you while keeping your hips and opposite leg on the floor.
the stretch: chest opener
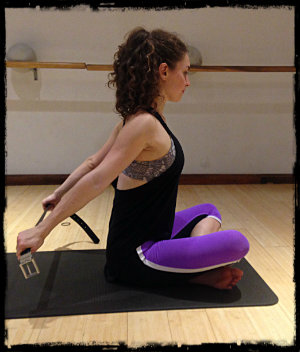
1. While sitting Indian style, hold the belt behind your back with your palms facing down.
2. Lift your hands up while you pull the belt apart, and you should feel your chest open. Make sure to keep your shoulders down!
the prop: pillow or towel
Pillows and towels can be used interchangeably to support the body and aid in relaxation. With pillows, try different shapes and firmness levels to see what feels best for your body. With towels, try rolling them in different ways to see how malleable or firm they can be in different positions.
the stretch: lower back stretch and support
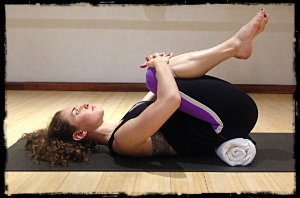
1. Lie on the floor, and place a pillow or a rolled up towel under your tailbone (not under your lower back! No need to arch your back and crunch your lower vertebrae). Your hips should be higher than your ribs.
2. Pull your knees into your chest to feel the lower back release.
Want a hip opener? Keep your hips where they are, and let your knees fall open to the side.
the stretch: chest opener
1.Lie on your back and place it a firm pillow (a bolster shape is good for this) or a rolled up towel between your shoulderblades.
2. Open your elbows to the sides, in line with your shoulders, and feel your chest muscles stretch and release.
Form note: Make sure you don’t splay your ribs or arch your back!
the prop: sports balls
Not for the paint of heart, lacrosse and tennis balls are the perfect at-home tools for self-myofascial release. Use these for massaging any sore or tight muscles.
the stretch:
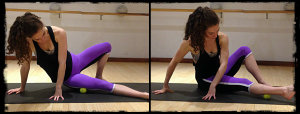
1. Lie down and place the ball underneath your tight muscle. Roll in all directions until you find the sweet spot of muscle pain. Deep breathe and roll until you feel the muscle release.
Form notes: If rolling on the floor feels awkward or is causing too much tension in other muscles, try placing the ball against a wall and rolling there. We recommend rolling the IT band, calf muscles and Achilles tendon, butt and upper back (in between the shoulder blades).
the prop: bag of dry beans or grains
Use these items like you would a weighted sandbag. They can help the body release unwanted tension and aid in relaxation.
the stretch: hamstring stretch
1. Lie down on your back and bring your right leg towards you.
2. Place the weighted item over your left ankle to anchor down your inactive leg while stretching.
the stretch: shoulder release
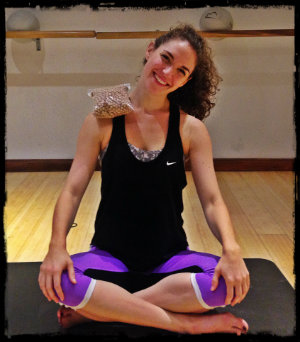
1. Place on shoulders as to release tension.
the stretch: pelvic awareness
1. Lie on the floor, bring feet together and let knees open wide.
2. Place weighted bag on pelvis to relieve menstrual cramps, find lower abdominal engagement or open your hips.